
This chapter contains the following topics:
General Function and Program Keys
Function keys are used throughout Passport. Although they are seldom absolutely necessary, an intelligent use of the function keys can simplify your data entry considerably.
|
Note |
The control, navigation and function key commands described in this chapter are for Windows only. UNIX users must use the equivalent key strokes. In many cases this is the same as Windows. |
When you are using Passport software, certain keys or combinations of keys perform various functions.
Key combinations listed in this documentation are shown as a sequence of key strokes. For example, to use the key <SF1>, press and hold down the <Shift> key, and then press <F1>.
The following table lists available Control keys.
|
Key |
Function |
|
Use after typing information in a field to finalize it. (For example, Type 100, and press <Enter>). This is required even if you have already completely filled the field. The entire contents of the field are entered (not merely the characters to the left of the cursor). |
|
|
On the first field of the first screen of a selection, cancel the selection and return to the menu. On a subsequent field, return to the first field of the screen and clear any fields entered so far after selecting the <Enter> key after the Cancel entry message displays. In any segment of a segmented field except the first, clear all segments and return to the first segment. The Tab key can function as either the Escape key or the Enter key. This is determined by a setting in the system. See your PBS Administrator for changing this function. |
The following table lists available Navigation keys.
|
Key |
Function |
|
Within an un-segmented field, clear the field and return to the previous field. Do this at any time before reaching Field number to change ?. |
|
|
|
Within a segmented field, clear the current segment (if not the first) and return to the previous segment. |
|
|
Within a scrolling window, move to the previous line. |
|
Same as <Enter>, except when entering certain tables. Often used to skip fields that do not require information. |
|
|
Arrow keys |
Within a scrolling window, move to the next line. |
|
On scrollable screens or windows, displays the previous or next screen (respectively). |
|
|
On scrollable screens or windows, moves to the first or last screen of data (respectively). |
*When using UNIX, press <Esc> twice to send the character.
The following table lists available Menu Navigation keys.
|
Key |
Function |
|
Select the highlighted selection of a module (or sub-selection within a selection submenu). |
|
|
Menu-bar and Windows menu only: Select a module and open or close a sub-menu selection. Tree-view menu only: Open or close the module, main and sub-menu selections. |
|
|
Move to the next or previous selection of a module, or sub-selection within a selection submenu. Menu-bar and Windows menu only: This wraps around upon reaching the top or bottom of a module menu. |
|
|
Move to the next selection beginning with that letter within a module menu, or to the next sub-selection beginning with that letter within a selection submenu. Tree-view menu only: In addition to the above, the first letter will also move to the module beginning with that letter. |
|
|
Tree-view menu only: Allows the user to move to the top of the menu items that are currently displayed. |
|
|
<F10> |
Provides keyboard access to the Windows menu. |
|
Tree-view menu only: Allows the user to move to the bottom of the menu items that are currently displayed. |
|
|
Tree-view menu only: Allows the user to move to the first available menu item. |
|
|
Tree-view menu only: Allows the user to move to the last available menu item. |
The characteristic action of some function keys, such as <F1>, <F2>, <F3>, and <F5> varies depending on the context. For instance, if a choice exists to select the next of something (vendors, account number etc.), pressing <F1> will display the next of that entity. If there is no next of <something>, the <F1> may have another function associated with that key. This is dependent on the application and its use will be described in a prompt.
|
Key |
Function |
|
Use for next of something. For example, the next account number, item number, or invoice. Use for the default value of something. |
|
|
Use for the previous of whatever <F1> accesses. |
|
|
Use for the first, last, earliest or latest of something. Use to define ranges. Also used for secondary record. For example, if <F1> is next invoice, <F2> may be next customer. |
|
|
Use for the previous of whatever <F2> accesses. |
|
|
Use to delete or remove information previously entered in a file. For example, to delete an existing customer or a miscellaneous charge in Accounts Receivable. |
|
|
Use to select <All> at certain fields. Also for special purposes in Passport modules. |
|
|
Use to access notes; for example in A/R Invoices: <F6> used to enter notes>. |
|
|
When running PBS in a Windows environment the <F7> key is used on date fields to access the Calendar control. There are also special uses in various Passport modules for <F7>. For example, in O/E, <F7> enables parcel tracking. Also, toggles between values. Used to access Lookup maintenance (administrative users only). |
|
|
Toggles a pop-up prompt window to appear or disappear. Unlike most other function keys, this one is persistent: The effect carries over to the next screen of the same selection, and continues until you toggle <SF7> again. |
|
|
Use as the Help key. When you are asked to enter information, press this key to get on-line Help on the current field or function.
Use to access Data Look Up. When entering data in a field that refers to this information from a related file. This enables you to view and select information from the related file. Press again to get the on-line help. |
|
|
Drill down from summary information to details relating to the summary information. Drill downs are only available using Windows Standard Vision file install. |
|
|
Menu-bar menu only. Used as a hot key to access the menu-bar while viewing an application screen. |
|
|
Use to call the Passport BreakOut function for a given field. See Data Entry, MySet and BreakOut chapter for details on how to use BreakOut. |
|
|
Use to toggle between character mode and graphical mode. |
If you are using Passport General Ledger and you allow correcting entries, other modules often use <F5> to mark a transaction (to be passed to GL) as a correcting entry. An <F5> prompt appears when this is allowed. Refer to the Control Information chapter in the G/L User documentation.
For example, if you enter a miscellaneous charge in A/R and are unsure of the customer’s name or number, press <F8> to list all of the customers on file without leaving the Miscellaneous charges screen. A window appears containing a list of the values from the related file, so that you can make a selection. This feature is described in the Using On-line Help and Using Data Lookup Windows sections.
If the field Allow protected changes is checked in Company information, it may be possible to override the protected change on certain fields. Protected changes are necessary to not only maintain database integrity but to restrict certain vital account information from being modified.
For example, if your valuation method is set for standard costing, it would not be advisable to inadvertently switch costing methods because of the changes to the layered information that would be effected by this change. In this instance, all associated fields would be protected, and an override would not be allowed. However, it may be possible to override fields such as sales amount and returned check amount.
If you perform a function on a field, and the Change not allowed message is displayed, press <F2>. If this field is not protected, you may be able modify the field’s contents. The message Allowing protected change will display. Once protected change has been overridden, it is not necessary to press <F2> again. The override remains in effect for subsequent transactions within this application and this session.
Maximum security is achieved when:
| • | Allow protected changes ? is left set to N in Company information, and |
| • | The Company information selection is protected by a password assigned to that selection only and known only to the system administrator. |
This ensures that whenever necessary the system administrator can rapidly override change protection on any field that permits it, without imposing any restriction on the normal use of any other selection.
If you have any questions on protected fields, consult with your system administrator or check with your accountant.
A row of buttons at the top of Passport Business Solutions screens provide mouse-enabled access to some common and a few Windows-only functions.
The following are how the buttons look.

Here is a description of each button from left to right.
Exit
This allows the user to exit a screen or terminate the data entry of a screen. It can also be used to exit the menu. This the same as the <Esc> key.
Left Arrow
This allows the user to view a previous record. This is equivalent to the <SF1> keys.
Right Arrow
This allows the user to view the next record. This is equivalent to the <F1> key.
Delete
When on Field number to change ?, this can be used to delete a master record or transaction entry and does the same function as the <F3> key.
Lookup/Help
This button either access Lookups or Help. The key equivalent is <F8>. These features are explained in detail later in this chapter.
BreakOut
This displays the Passport BreakOut™ Window. You must be on a field for this button to be accessible. This is equal to the <F12> key. See Chapter 3 Data Entry and BreakOut for more information.
Copy to clipboard
Copies data from a highlighted portion of a field to the clipboard memory of Windows. The keyboard equivalent keys are <Ctl+C>.
Paste from clipboard
Pastes data from the Windows clipboard to a PBS field. The keyboard equivalent is <Ctl+V>. If the data you are copying into a PBS field is longer than the field can accept, then the data will be truncated.
Print Screen
This displays a Windows Printer dialog box where you can print the currently screen displayed screen. With the keyboard you can use <Ctl+P>.
This displays the workstation default email application and then opens a ‘send-new-email’ message window.
If your cursor is on a field that has an email address, such as the A/R Customers (Enter) field 6, then it will also copy the email address to the ‘mail-to’ field of the ‘send-new-email’ message window.
Calculator
This launches the Windows calculator. You can use the calculator to do calculations and then copy the results back to a PBS field.
Notepad
Executes the Windows Notepad application. A user can copy and paste data between a PBS field and Notepad. You can also use notepad for general notes.
Documentation / Web Browser
This launches the PBS Browser which is tied into the default workstation Internet browser. The Browser displays the default PBS documentation in HTML format. While clicking on a link or opening a file in the browser, you may access an Internet address, local files, a saved PBS HTML report and other file types.
For a list of the other functions, read the section on Create HTML in the Starting PBS, Menu and Printing chapter.
Drill Down
The drill down button has no function in the most recent version of PBS.
Passport Data Query (PDQ)
PBS Data Query can only be used with the Standard Vision file version of PBS. It is not available when using PBS SQL.
This button can only be used on Character mode screens and the menu.
This button provides access to Passport Data Query. You must be licensed for PDQ in order to use this feature. If you are not licensed for PDQ, then contact your PBS provider for instructions.
Passport Business Solutions software uses windows display user options or accept user input. These windows automatically appear at various times depending on your activity. An example includes <F6> to enter notes.
The types of windows in PBS include:
| 1. | Prompt |
| 2. | Data entry |
| 3. | Selection |
| 4. | Data lookup |
When entering data there are frequently several function keys which may be used. To assist you, one of the following forms of assistance is usually provided. If there are four or less options which can be described on a line, they will be described on one line near the bottom of the screen. If there are more than four options, or the descriptions exceed one line, they will be described in a prompt window.
This window appears when you can enter data or information. For example, pressing <F6> while in the Vendors selection in Accounts Payable will display a window from which you can enter notes and pressing <F7> displays vendor contacts.
This type of window appears when you need to make a selection from several options or values. The printer selection box is an example of this window, although there are others. In this type of window, you use the mouse or arrow keys to change the highlighted entry and press <Enter> to accept the entry.
Data lookups are similar to selection windows. They have more features than selection windows so they are considered a different type. The next section explains data lookups.
Many fields in Passport software require data entered in another file or table. The Data lookup window feature enables you to view and select information from a related file/table. The Data lookup window provides a means of viewing a list of the records, finding the record you need and a way of entering a field.
|
Note |
In graphical mode, context sensitive help is accessed by pressing <Ctrl+F1> or by selecting Help from the screen menu. In character mode, depending on where you press <F8> this function will return a Data Lookup window or in character mode, context sensitive Help. If a Data Lookup window is returned, pressing <F8>a second time will display Help for the field when available. You can also access <F8> function using your mouse by clicking on the ‘Binoculars/Question mark’ button in the tool bar. |
Examples will be shown from the Accounts Receivable customers. The data displayed will vary according to the information you entered. For example, the vendor number field may be in this category.
Lookups can be graphical windows-based or classic character-based. The following sections describes the features of the graphical windows-based and classic character-based lookups.
There are two means of accessing the graphical lookups. First is from fully graphical screens. Second is from the character based screens. This section describes the Lookups from both types.
Lookups can only be accessed from specific fields on a screen and they are not available from all fields and all screens. Here is the A/R invoice entry screen where there are six fields that have lookups:
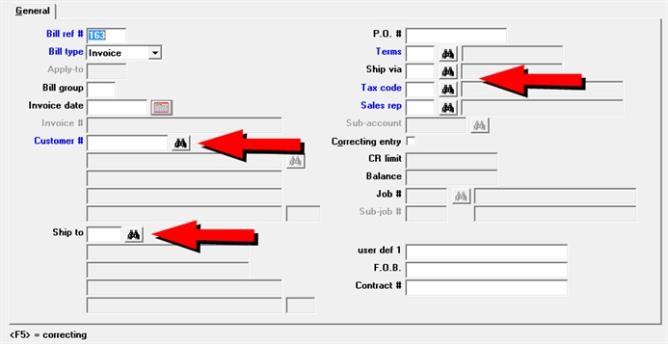
When the focus is on the field, you may access a lookup using either entering the <F8> key, clicking on the binoculars button to the right of the field or selecting Find from the Tools menu. Here is an example of the customer lookup:
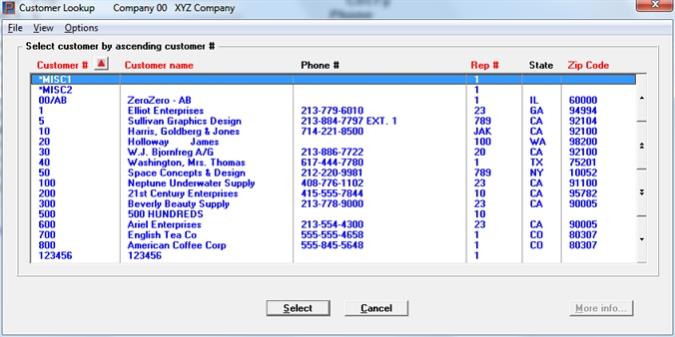
Each lookup is a list box. The list box displays multiple records and it can access more records if there are more available. In most cases you may sort the records on multiple fields. Sorting can always be in ascending or descending order. Only columns with red labels may be sorted. Click the column name or the arrow to the right of the column name to change the sort or use the View menu options.
To locate a record, start typing the number, name or code, depending on which sort field is selected. You may also use the up/down arrows, Page up, Page down, Home and End keys to locate an employee. You may also use the mouse on the single and multiple arrow buttons to the right of the list box.
Select and Cancel
When the correct record is found, click on the Select button accept it. Select Cancel to return to the entry screen without selecting a record.
More info...
In many cases there is a More info button. When available, it is always on the right side near the bottom of the screen.

When you select the More info button it will access a view only version of the same screen or screens used when entering the record. Users who do not have access to the menu selection for editing the records also do not have permission to access more information about the record.
Options
A few lookups have an Options menu. The Options menu for the Customer lookup allows access to the View invoice history. The Options menu on the Vendor lookup allows access to the View vendor invoices. On the customer lookup example below, you may access View invoice history:

Selecting this option will find the first invoice for the customer selected in the lookup list box. For example, if the customer selected is customer number 1 - Elliot Enterprises, the View invoice history will displays invoices for Elliot Enterprises. You may see the header, lines and totals for each invoice.
Other customers and invoices are accessible from View invoice history.
Select and Exit
There are two buttons available on a More info screen. Clicking on Select will put the focus of the selected record into the Lookup. Clicking on Exit will retain the focus that was previously selected in the Lookup.
The graphical lookups are available on the Windows Character mode screens.
On Windows character mode screens there is an indicator to the right of the field to let you know that there is a Lookup for the field. You can click on this indicator to launch the Lookup. The Lookup indicator will not display unless the cursor is on the field. Here is an example of a account number Lookup indicator on the Valid G/L accounts screen:
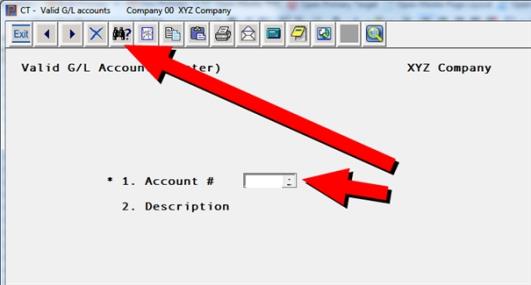
Once on the field, to view the lookup list box, you may press <F8>, or as seen above, click on the Lookup indicator or click on the binoculars/question mark on the tool bar.
On Windows systems, the lookup that is accessed in graphical mode, displays in character mode. The lookup options are explained above.
Classic character mode Lookups are available in both Windows or UNIX/Linux.
Whether using character mode or graphical mode in windows or Thin client, the graphical mode lookups are standard. The classic lookups are only available via special settings of the configuration files. In UNIX/Linux telnet mode the classic lookups are the default.
Here is an example of the Employee classic lookup:
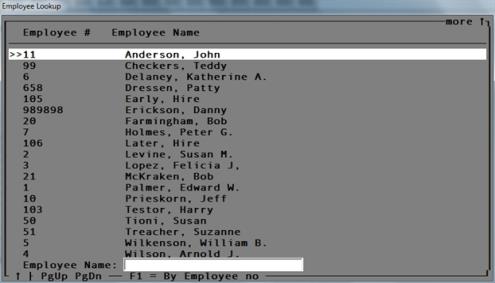
To locate a record, you may either:
| • | Type the name or number of the record |
| • | Use the up and down arrow keys |
| • | Use the page up and page down arrow keys to advance the list |
When the record is found select the <Enter> key to fill in the fields. In the case of a Valid G/L account, Cash accounts or Chart of accounts lookup, when sorting by account number, in order to select an account, use the <F7> key.
When available, for an alternate sort, select the <F1> key.
Help provides information about the data to be input into a field. Help information parallels what is in the user documentation and indicates the nature and use of the data. There are differences with Help when using Graphical mode screens vs. Character mode screens and these differences are explained next.
You may access the documentation for all the PBS modules through the Documentation / Web browser button. Without clicking, run your mouse over the buttons to see the names. Select the Documentation / Web browser button and a list of modules display. Click on the link for the appropriate application. For what to do next, see Help with Navigation.
Help is available on the full graphical screens, fields, buttons and list boxes by pressing <Ctrl+F1> or selecting Help from the menu. Depending on where you are in the system and where the focus is, you may be accessing help for a specific field, for a chapter, section of a chapter or the entire user document.
Here is an example the help screen:
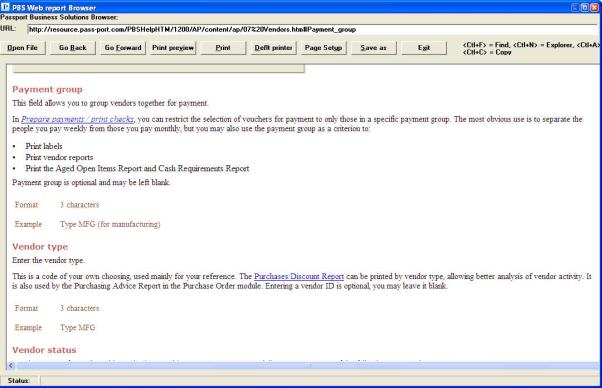
From here, you can access help for the entire chapter by using the arrow keys, PageUp/Down keys and the Home/End keys.
You can also access help from other chapters by going to the top or bottom of the chapter. There you will see a link:
When accessing PBS from a field or screen it normally links to one chapter only. When this occurs, at the top and bottom of each chapter you will see a link that indicates Open topic with navigation. Selecting this link provides access to the table of contents, index, search features; basically all the chapters of the application. Here is an example with a blue arrow pointing to this link:

When accessing the documentation through the browser button it will open the document with navigation automatically.
When opening the documentation with navigation the window will look something like this:
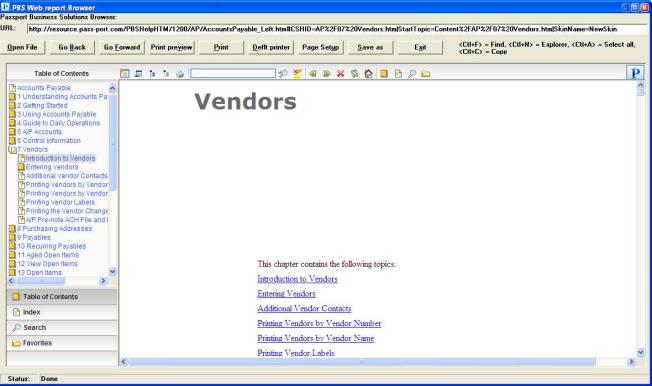
The help navigation window, on the left, has a several selections. Here is a description of each:
The table of contents is the default display. Table of contents hierarchy is Chapter, Main heading, Heading 2 and Heading 3. The chapters are all numbered with the exception of appendices which have alpha characters.
The first page of each chapter has links to the Main headings.
This is an index of the documentation. It helps you find a topic quickly.
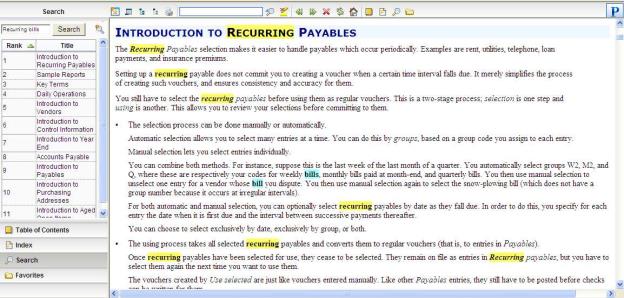
You may enter and search for matching data in all the chapters of the documentation. For example, if you search for "recurring bills", then it will display topics that have the words "recurring" and "bills". It ranks the search in order of the number of times it finds the words. After you select a topic, it highlights the searched words with a different color for each word. In this example the words "recurring" and "bills" are highlighted.

|
You can remove the highlighting by clicking on the Remove Search Highlighting button. |
The topic that is currently selected can be added to your favorites. This allows you to quickly find the topic later.
Help Buttons
The description of the buttons are from left to right.
See the description for Favorites from the Navigation window.
This button toggles on and off the display of the navigation window.
This currently has no function.
This currently has no function.
This will display a window where you may print the displayed topic. In the windows you have options of selecting a printer, enter the number of copies, enter a range of pages and more.
In this field you may search on one or more words in the displayed topic. If found, the program will not move to the word, but highlight it in yellow.
Another method to search is select the <Ctrl+F> keys and search for one or more words. When found, the focus moves to the part of the page where the word or words are found.
After using Quick search, the program highlights the word or words found in yellow. You may remove this highlighting with this button.
This moves the focus back to a previous selection.
If you have selected the Back button, this moves the focus forward to what was selected before.
This will stop the retrieval of html data.
This will refresh the help documentation. This is useful when the documentation has changed.
This will move the focus to the first page of the title chapter.
The opens the table of contents in the navigation window. See Table of Contents
This opens the index in the navigation window. See Index
This opens the search in the navigation window. See Search
This opens the favorites in the navigation window. See Favorites
This moves the focus back to a previous topic. A previous topic could be in the current chapter or a previous chapter. Each table of contents selection is a separate topic.
This moves the focus to the next topic. The next topic could be in same chapter or the next chapter. Each table of contents selection is a separate topic.
For most data entry fields, you can receive field specific information by pressing <F8>, clicking on the question mark with the mouse or clicking on the up arrow to the right of the field. For example, when you access the Vendors (Enter) selection, the following section of the screen shows the field with a lookup button to the right of the field:

In this example, to obtain information about the data required for the first field, press <F8> or click on the up arrow. In UNIX or Linux you may only select <F8>. The lookup displays.
|
Note |
Depending on where you press <F8>, this function will return a Data Lookup window or context sensitive Help. If a Data Lookup window is returned, pressing <F8> a second time will display Help for the field if available. |
After selecting <F8> again, the following help screen displays:
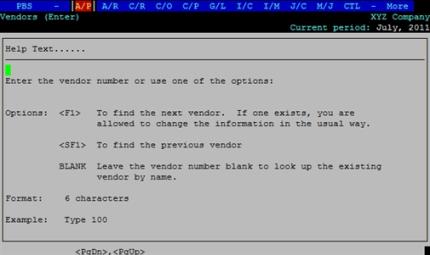
For this field, there is more Help text than can be displayed on the screen.
Scroll through pages by using the <PgUp> or <PgDn> keys.
Press <Esc> at any time to exit from Help and return to the field. No data on the screen will be affected by this process. The same Help information appears for each company.
Character Help in Windows
PSI is in the process of generating screens in Graphical mode. Even when you are set up for Graphical mode, some screens may still be in Character mode. As updates are released, additional graphical mode screens will become available.
After selecting <F8> again the following context sensitive help window appears over the Vendors (Enter) window:

For this field, there is more Help text than can be displayed on the screen (notice the word More on the upper right side of the window).
You can also scroll through lines of text by using the up and down arrow keys. Scroll through pages by using the <PgUp> or <PgDn> keys. Notice that the scroll bar indicator moves in a vertical fashion along the right side of the Help display. To go directly to the beginning or end of the Help text for this field, use the <Home> or <End> key.
Press <Esc> at any time to exit from Help and return to the field. No data on the screen will be affected by this process. The same Help information appears for each company.
This section applies when using notes on character mode screens. If you are using graphical mode, then entering and editing text is documented in the User documentation. Graphical mode notes editing follows the Windows standards and tends to be more intuitive to experienced Windows users.
In many selections, you have the ability to attach a note to a document (e.g. an order or an invoice) or to an entry (e.g. a customer, a vendor, an inventory item).
These notes do not appear on any document sent off-site, but they may be viewed later on many screens, and may optionally be included on edit lists and other reports.
Whenever the note feature is available, a prompt appears. When notes are available, <F6> will access this function. When no notes are available, <F6> may be used for any function which would not normally be assigned to another function key. In this case, notes are not available at that location.
The ampersand (&) appears on the screen when a note is already on file for the customer or order (or some other entity). Thus, you do not have to check each entry to see which has a note.
As many notes as desired may be attached to the same entry. Each note is given a date/time stamp enabling you to browse through the notes in time sequence.
Do not confuse notes with Notes line items or with Comments:
| • | Notes line items do appear on a document. They are used in documents such as orders, invoices, and quotations. |
| • | Comments may or may not appear on a document, depending on how you have set up your print layout format for the document. Using character mode, comments appear in many selections as separate numbered fields on a screen, for instance in the total screens of invoices and orders. |
A note attached to a document in one selection remains on that document even when it is transferred to a different document; for example, when an order becomes an invoice.
Press <F6>. The following screen displays:
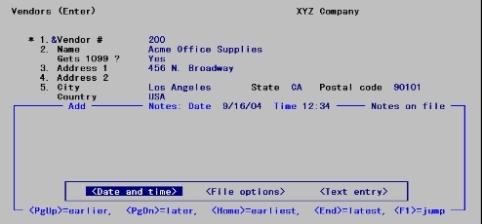
To browse through existing notes, use the <PgUp>, <PgDn>, <Home>, <End>, and <F1> keys. For further details about entering notes, refer to the A. Character Mode Notes and Comments Text Editing appendix.
A menu at the bottom of the Notes area shows three selections:
Use this selection to change the date and/or time of a note.
When you select File options, you have these choices:
|
Options |
Description |
|
File |
Save what was entered or changed (similar to pressing <Enter> at <Field number to change ?> found in other selections). |
|
Save & |
Save what was entered or changed, but leave the information on the screen for continued editing. |
|
Abandon changes |
Discard what was entered or changed (similar to pressing <Esc> in other selections). |
|
Delete |
Delete the entire document. You will be asked to confirm the deletion (similar to pressing <F3> in other selections). |
When you are finished using notes, press <Esc>.
When you select Text entry, the cursor is positioned at the first line.
| • | You enter text in much the same way as most word processing programs, using <Enter> , arrow keys, <Delete> etc. When you are finished entering text, press <Esc>, and follow the screen instructions. |
| • | If you wish to use the more powerful text editing commands which are included in this editor, refer to the Text Editing appendix. |
|
Format: |
This varies with the application, and is specified in each case. A typical note might allow ten lines of 77 characters each. Unused trailing spaces on a line, or trailing lines in a note, occupy no space on file. |
There is a special note for Customers that can be viewed in the Point of Sale transaction screen. To enter this note go to Account Receivable > Customers. Select or enter a customer and then select <F6> for notes. Highlight <Data and time> and select enter. The cursor will move to the date field. At the bottom of the screen you will see the prompt; <F1> = Customer Memo (Point of Sale). Select the <F1> key and then enter the note. After this note has been entered, it will display in Point of Sale, transactions immediately after the customer number or name has been entered.
After you have received your first order, you may use the forms ordering info selection. Based on your estimated rate of usage, this feature reminds you when it is time to re-order each form. The system does not actually maintain a tally of each page as it is printed; instead it applies your own estimated rate of use, supply on hand, and re-order quantity. You can change any of these at any time.
Unlike the other function keys described in this chapter, <F2> (when used for this purpose) is available only at startup. The option is presented on the same screen in which you are requested to enter your initials:
| • | If you are due to order forms, the program displays a window reminding you of that fact each time you log on to the Passport. You can alter only those entries which are at the re-order point. The assumption is that you will order the quantity desired and enter the anticipated delivery date and quantity ordered. This satisfies the system and prevents you from getting the warning the next time you log on. Alternately, if you do in fact have an adequate supply you can correct the information on file and again satisfy the system. |
| • | If you are not at the re-order point, the screen does not normally appear at startup. You can still bring it up by pressing the function key. If you do, you can adjust any of the entries, not just overdue ones, as well as adding and deleting entries. |
This screen consists of a header telling you what your next re-order number is, and a detail area containing a table. Each form is on its own separate line.
This is the last order number printed in the lower left-hand corner of the Forms Source re-order form that is included in each module of forms that you receive. When you place your next order, give this number to the Forms Source representative. This will help process your order more quickly.
|
Format: |
Six characters |
|
Note |
Each module of forms includes a reorder form. Each reorder form shows a different last order number. Use any one of these numbers as your reorder number. |
The Table Area
If the screen was displayed automatically (because you are at the re-order point), only those forms are displayed which do in fact need to be re-ordered. This is the reorder mode. If you have not fallen behind in your ordering, this means the entire table will consist of a single line. You can change any of the entries displayed, but cannot add or delete entries.
If the screen was displayed as a result of your pressing <F2>, all forms appear whose inventory you have chosen to track. This is the normal mode. The table does not scroll, so you can monitor a maximum of fourteen separate forms.
In both cases, a highlighted bar indicates the current entry. The cursor will be in the first column.
Options
Your options are:
|
<Up>, <Down> |
To move to a different entry |
|
<Enter> |
To accept or change information in the first column. The cursor will move to the next column, allowing entry or change of all fields on that line. |
|
<Esc> |
To terminate data entry, accepting all information entered so far, and to return to the startup screen. |
In normal mode (but not re-order mode), additional options are:
|
<F2> |
To insert a new entry (provided there are not already fourteen entries). The highlighted line and all subsequent lines scroll down by one, allowing a new entry on the current line. To cancel the insertion, press <Enter> to move to the <Start date> column, then press <Up>. |
|
<F3> |
To delete the highlighted entry. |
|
<F5> |
To return to entering the re-order number. |
For each row, enter the following columns:
Form #
When the cursor is in this column, a scrollable box appears showing all Passport forms currently available. The current form number and description is highlighted. Form number may only be entered by selection from this box (that is, you may not key it in directly).
Options
Use one of the options:
|
<Up>, <Down> |
To move the highlighted bar up or down. The forms will scroll when the top or bottom boundary is reached |
|
<PgUp>, |
To scroll forwards or backwards a screen at a time. |
|
<Enter> |
To select the highlighted form |
|
<Esc> |
To close this box |
|
Format: |
Eight characters |
Start date
Enter the past or future date corresponding to the quantity on hand which you intend to enter in the next column. The program will use this and the remaining information on this line to calculate a reminder date. If you prefer to enter a reminder date explicitly rather than have the system calculate it for you, you may leave this field blank.
If you are entering an insertion and choose to cancel the insertion, you may also use the option:
|
<Up> |
To cancel the insertion. |
|
Format |
MMDDYY |
Start stock
Enter the number of forms that you have on hand as of the start date, leave this blank if you intend to enter an explicit reminder date. The unit of measure (pages, cases, or whatever) is up to you, but should be consistent for any one form.
|
Format |
99999 |
Weekly usage
Enter the number of forms you expect to use each week.
|
Format |
9999 |
Min. stock
Enter the stock level which when reached will trigger the reminder. You may leave this blank if you intend to enter an explicit reminder date.
|
Format |
9999 |
Reminder date
When this date arrives, you will be reminded to re-order every time you start up Passport. Enter the reminder date to re-order this form. Provided that non-zero values are present in the four columns to the left of this field, you may also use the option:
|
<F1> |
To use the date displayed, which has been calculated automatically. |
|
Format |
MMDDYY |